Blower Drying a Car Technique
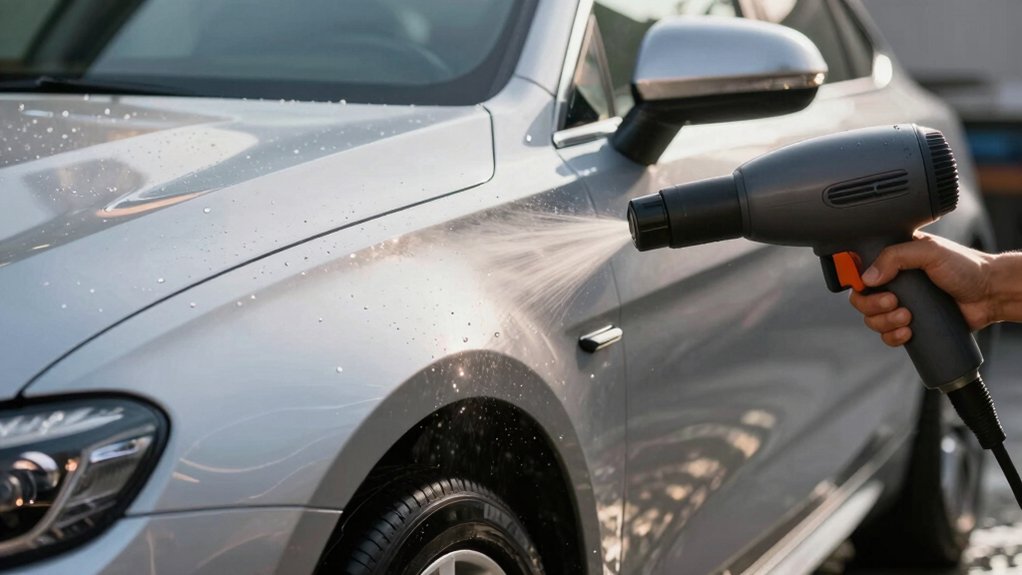
You’ll hold the blower about one foot away. Never closer than six inches. Start on high to clear bulk water; then drop to low for finishing. Use side-to-side sweeping with a slight tilt.
Keep steady, overlapping passes, and test a small panel first. Use a 3/8″ nozzle, 60–80 PSI (higher for bulk, lower for finish), and choose brass or stainless tips for durability. Follow attachment checks and maintenance. You can learn practical setup and step-by-step tips.
Quick Overview
- Start on high power about one foot away to remove bulk water; then reduce power for finishing passes.
- Use a narrow, slightly tilted fan and sweep side-to-side with overlapping passes to avoid concentrated force.
- Keep the nozzle about one foot; never closer than six inches to protect paint and trim.
- Match CFM to vehicle size. Compact cars need less; larger trucks benefit from up to ~3,000 CFM.
- Use a 3/8″ brass or stainless nozzle at 60–80 PSI. Inspect tips and test attachments at low power first.
Blower Airspeed & Distance
How close should you hold the blower? You’ll keep it about one foot away; never closer than six inches to protect paint and maintain car safety. Start high power to clear bulk water. Then drop to low for finishing. Use side-to-side sweeping with a slight tilt; avoid a fixed, concentrated blast.
| Speed setting | Distance | Purpose |
|---|---|---|
| High | 12 in | Bulk water removal |
| Medium | 8–12 in | Crevices, trim |
| Low | 6–12 in | Final finish |
Choose a blower with variable speed and good gear ergonomics to reduce fatigue during larger jobs. Prioritize CFM over raw MPH. Never let air pressure cause bounce-back or surface damage.
200–3000 CFM Guideline
Having covered ideal distances and speed settings, you should next consider blower airflow: specifically the 3,000 CFM guideline to match tool performance with the job. You’ll use this benchmark to decide if a unit handles bulk water removal without risking paint damage. Treat 3,000 CFM as a practical ceiling for handheld tasks. Higher flow is often overkill and can create turbulence.
- Match CFM to vehicle size: compact cars need less; larger trucks benefit from near-3,000 CFM.
- Balance power and control: you want force for crevices without blowing debris.
- Efficiency metric: 3,000 CFM shortens time while preserving finish when combined with correct distance.
- Avoid chasing extremes: focus on two word discussion ideas, not subtopic irrelevance.
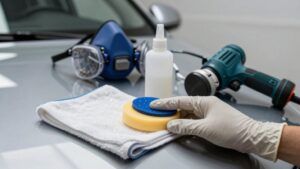
Nozzle Size: 3/8″ Tip
With a 3/8″ tip you’ll get a focused airstream that balances pressure and coverage for most automotive panels. Pay attention to spray pattern control and material: metal or reinforced plastic nozzles change airflow and durability while weighing faster drying against potential paint stress.
Before use, confirm the tip matches your blower’s fittings. Try lower settings first to test performance on trim and glass.
Optimal Air Pressure
For most handheld blowers using a 3/8″ tip, you’ll want air pressure around 60–80 PSI to balance strong water displacement with safe paint contact. This range gives enough force to shear water from seams and crevices without risking finish damage when you keep the nozzle about a foot away.
You’ll set pressure near 80 PSI for initial bulk removal; then lower toward 60 PSI for finish passes. Maintain the optimal distance—about one foot—and use steady, overlapping passes to avoid concentrating force.
Monitor noise considerations: higher PSI raises sound, so wear hearing protection during extended use and be considerate in residential areas. Check results on a small panel first and adjust within the 60–80 PSI band.
Spray Pattern Control
After you set pressure in the 60–80 PSI range, control of the spray pattern becomes the next variable to fine-tune using the 3/8” tip. You’ll aim for a narrow, concentrated fan that displaces water without blasting paint.
Hold the blower about a foot away and sweep side-to-side, keeping the nozzle at a shallow angle to maintain laminar flow. Adjust throttle in small increments to control airspeed so water beads and rolls rather than splashes.
For crevices, shorten the sweep and increase pulse frequency. For broad panels, widen each pass and slow your motion. Monitor results and make micro-adjustments: consistent overlap, steady distance, and measured airspeed deliver uniform drying without surface disturbance.
Drying Speed Tradeoffs
How quickly do you want the job done versus how gentle you need to be? With a 3/8″ tip, you balance drying speed against potential surface stress. You’ll get focused airflow that removes water fast from seams and trim; yet, it concentrates force. Therefore, you must hold the blower farther back and sweep continuously.
Increase motor setting for faster drying speed on horizontal panels. Then drop power near delicate trim, glass, and edges to avoid pushing water into gaps or stressing seals. The tradeoffs are simple: higher speed shortens time but raises risk; lower speed protects finishes but extends work. Plan a two-stage pass: bulk removal at higher power, finishing at lower—to optimize time and safety.
Nozzle Material Choices
Choosing the right nozzle material matters when you’re using a 3/8″ tip: it determines durability, airflow consistency, and paint safety. You’ll prefer brass for longevity and stable spray pattern under heat; it resists deformation and preserves the 3/8″ orifice.
Stainless steel gives similar wear resistance with corrosion protection if you store the blower wet. Plastic nozzles are lightweight and cheaper but can warp, altering the spray pattern and risking paint contact. Use them only for light, short jobs.
Rubber-coated tips reduce the chance of scratching trim and offer slight airflow diffusion for gentler finishing passes. Inspect the nozzle material before each session for burrs or cracks. Replace damaged tips promptly to maintain consistent airflow and protect the finish.
Attachment Compatibility Checks
Which attachments will fit and perform reliably with a 3/8″ tip? You’ll check attachment compatibility by matching inner diameters, thread types, and locking mechanisms. Start by confirming the blower outlet spec and comparing it to attachment inner diameter. A true 3/8″ tip requires tight tolerances to maintain air velocity.
Inspect nozzle material for wear resistance and secure fit. Metal alloy nozzles often hold shape better than softer plastics. Verify threads (BSP, NPT, or proprietary) and ensure any quick-release coupler seats without play. Test each attachment briefly at low power to confirm there’s no wobble, vibration, or air leakage.
Record compatible models and reject adapters that introduce movement or reduce effective airflow.
Maintenance And Cleaning
After verifying attachments for a secure fit on the 3/8″ tip, you should set a regular maintenance routine to keep the nozzle and outlet performing at peak air velocity. Follow maintenance basics: inspect the tip, housing, and cord before each use, check for cracks or loosened fittings, and tighten or replace parts immediately.
Schedule deeper service monthly if you use the blower frequently. For cleaning routines, remove debris from the nozzle with a soft brush; clear the outlet with compressed air, and wipe external surfaces with a damp microfiber cloth. Avoid solvents that could damage seals. Store the blower in a dry, ventilated area.
Log inspections and cleanings so you can spot trends and prevent failures.
Frequently Asked Questions
Can a Blower Damage Aftermarket Vinyl Wraps or Decals?
Yes, blowing air too close or on high blower power settings can harm vinyl. You should treat wrap safety concerns seriously. You’ll keep the blower about a foot away; use lower settings for edges and decals. Employ sweeping motions to protect decal integrity.
Stay mobile to avoid focused heat or pressure. Test a small area first. Finish with a microfiber towel and drying aid for safe, complete drying.
How Do I Prevent Water Entering Electronic Sensors and Cameras?
Keep sensors and cameras dry by using water ingress prevention: Hold the blower about a foot away, use lower settings for close passes, and angle airflow to push water away from openings.
Start with a quick high blast from a distance; then finish gently. Shield connectors with tape or silicon plugs. Dry door jambs and camera housings first, and finish with a microfiber wipe to ensure camera protection and no trapped moisture.
Is Blower Drying Safe on Matte or Satin Paint Finishes?
Yes, you can safely use a blower on matte or satin finishes if you follow blower care and safety considerations. Keep the blower about a foot away, use lower settings for finishing, and avoid direct contact with paint.
Start with high power to remove bulk water; then reduce airflow for delicate areas. Finish with microfiber wipes and drying aid for spot checks. This will protect texture and prevent gloss changes.
Can I Use a Leaf Blower Instead of a Dedicated Car Dryer?
Yes, you can use a leaf blower as a drying technique, but be careful. Hold the leaf blower about one foot away. Use high settings first, then lower for finishing, and keep a slight angle with continuous side-to-side motion.
Prioritize wheels and mirrors first. Then, do the roof to hood and sides top-to-bottom. Avoid direct contact with paint; use ergonomic models for comfort. Finish with microfiber towels and a cool, low-air blast.
What Maintenance Does the Blower Itself Require After Use?
You should clean and inspect the blower after each session: wipe exterior, remove debris from intake and nozzle, check cord and plug for damage, and tighten any loose fasteners.
Replace or clean filters per manufacturer guidelines and store the unit dry and off the ground. Run a brief no-load test monthly. Keep a maintenance log.
Include safety reminders: unplug before servicing, avoid wet conditions, and use proper PPE when handling hot or moving parts.
Conclusion
You’ve got the basics: match blower airspeed and distance to sheet the water off without scouring the paint. Use 200–3000 CFM guidance, a 3/8″ nozzle tip, and the right pressure for fast, safe drying. Control the spray pattern; trade speed for finish, and pick durable nozzle materials and compatible attachments.
Inspect and clean components regularly. Follow these steps methodically, and you’ll dry cars efficiently while protecting paint and trim.