Clay Bar How It Works on Car Paint

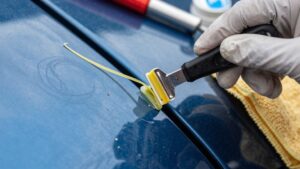
You use a lubricated clay bar to mechanically lift bonded contamination from cured clearcoat without cutting the paint. Glide it gently over small, well-lubricated sections until the surface becomes smooth. Match clay aggressiveness to contamination level and paint sensitivity; test lubricant compatibility. Work in the manufacturer’s temperature/humidity window to avoid surface shear or softening.
Always follow with polishing and protection to remove marring and lock in gloss. Keep going to learn safe cure and prep timing.
Quick Overview
- A clay bar mechanically lifts bonded surface contaminants (industrial fallout, rail dust, overspray, tar) that washing alone cannot remove.
- The lubricant creates a slippery film preventing shear damage while the clay glides and picks up particles from the paint.
- Choose clay grit (fine/medium/heavy) based on contamination severity and paint sensitivity to balance removal and marring.
- Work small shaded sections with generous lube until the surface feels smooth. Then, follow with polishing to remove any micro-marring.
- Ensure paint has cured to handling hardness. Avoid claying in extreme temperatures or humidity to prevent surface softening or drag.
Clay Bar Grit Levels
Why choose one clay bar grit over another? You’ll match contamination severity, paint sensitivity, and final finish when performing clay bar selection; grit level comparison guides that choice. Use fine for light fallout, medium for regular urban grime, and heavy only for baked-on deposits. Always follow with polishing.
| Grit Category | Typical Use | Outcome |
|---|---|---|
| Fine (light) | Light contamination, sensitive paints | Removes minor debris, minimal marring |
| Medium | Daily drivers, tree sap, brake dust | Balanced removal; may need light polish |
| Heavy (aggressive) | Years of buildup, tar | Fast cut; leaves marring and requires polishing |
Apply in shaded areas, lubricate generously, and work 2×2 ft sections. Stop when glide is smooth. Avoid ceramic coatings and matte finishes.
Clay Lubricant Compatibility Checklist
Curious which lubricant will protect your paint while letting the clay do its job? Use this compatibility checklist to make technical, practical choices. Consider clay lubricant chemistry against manufacturer grit levels and intended contamination load. Match viscosity to temperature range and humidity effects to prevent drying or drag. Account for cure acceleration additives only if post cure handling won’t be compromised.
- Test film thickness and slip: confirm lubricant prevents shear damage across grit levels and maintains clay adhesion.
- Environmental tolerance: verify performance across expected temperatures and humidity effects. Avoid formulas that prematurely tack or evaporate.
- Coating interaction: ensure no cure acceleration or inhibition with existing sealants. Plan post cure handling and recoat windows.
Curing Times and Temperatures
Before you clay, understand how paint curing, temperature, and humidity affect surface readiness and your timing for follow-up protection. Work within the optimal temperature range and consider humidity-driven cure delays to predict realistic curing times and safe acceleration methods.
I’ll outline typical cure estimates and approved ways to speed cure without compromising the clear coat.
Paint Drying Basics
Curing is the controlled chemical and physical hardening of automotive paint where solvents evaporate and resins cross-link. You’ll find this process depends on paint type, film thickness, ambient temperature, and humidity.
You need to understand paint drying kinetics because incomplete cure leaves a softer film that compromises clay bar adhesion and subsequent coatings. Solvent-borne and waterborne systems exhibit different evaporation and cross-linking rates; factory-baked finishes cure faster than ambient-cured clear coats. Thicker films require longer dwell times to reach handling hardness. High humidity slows solvent removal and can trap moisture in the film, while low temperatures reduce molecular mobility and extend cure time.
Measure tack and hardness before claying. Wait until the surface resists imprinting to avoid marring or pulling uncured material.
Optimal Temperature Range
Having confirmed the clear coat has reached handling hardness, you need to consider how temperature will affect final cure rates and when it’s safe to clay or apply protective coatings. You should target the manufacturer’s optimal temperature band: typically between 15°C and 25°C for predictable polymer crosslinking and surface stability. Below that range, cure kinetics slow; this increases susceptibility to surface pickup. Above it, volatiles evaporate fast and softening reduces resistance to clay bar tolerances and deformation.
Work only when substrate and ambient temperatures fall within specified limits. Verify with an infrared thermometer. If you must operate near the limits, reduce pressure, increase lubricant, and shorten contact time to protect the clear coat. Document conditions and wait for full cure before applying long-term coatings.
Humidity Effects On Curing
Humidity plays a critical role in clear coat cure kinetics, and you should monitor it alongside temperature because moisture alters solvent evaporation rates, crosslinking efficiency, and surface tack. You’ll see humidity effects on curing as slowed solvent loss at high relative humidity, promoting longer open times and increased surface tack. Low humidity accelerates evaporation and can cause incomplete flow or micro-porosity.
When planning claying and subsequent coatings, account for ambient humidity and recommended curing times and temperatures from manufacturers. High humidity may require elevated temperatures or extended dwell to reach equivalent crosslink density. Use controlled drying environments or dehumidification to stabilize cure kinetics. Measure surface tack and hardness rather than relying solely on elapsed time to verify adequate cure.
Curing Time Estimates
How long a clear coat reaches usable hardness depends on temperature, relative humidity, and the coating’s chemistry. You should plan schedules around those variables rather than fixed clock times. In practice, curing time estimates typically span from several hours to several days for touch handling; they take 7–30 days for full chemical crosslinking at ambient conditions.
Higher temperatures accelerate kinetic curing; high humidity can retard solvent evaporation or hydrolysis-cure systems. You should monitor substrate temperature, consult the coating TDS, and use infrared or surface-dry checks rather than arbitrary hours. Also verify the clay lubricant compatibility checklist before decontamination: some lubricants can interact with incompletely cured films. Log conditions and test small areas to confirm safe claying windows.
Accelerating Cure Safely
When you need to accelerate a clear-coat cure, balance temperature elevation and safe exposure times to speed crosslinking without degrading the film or nearby materials. You’ll control temperature ramps, peak hold, and cool-down to drive polymer network formation while preventing solvent entrapment, blush, or softening of adjacent trims.
Use infrared or forced-air at manufacturer-recommended maximums; every 5–10°C increase can reduce cure time nonlinearly but raises the risk of thermal stress. Monitor surface tack and hardness with simple fingernail or pendulum tests rather than guessing.
Keep exposure uniform and limit cycles to avoid heat concentration. Document time–temperature profiles and adhere to substrate and coating specifications so you’re accelerating cure safely and reproducibly.
Post-Cure Handling
Although accelerating cure can save time, you should respect specified post-cure holding times and temperature ranges to ensure the clear coat reaches its designed hardness and chemical resistance. You’ll monitor ambient and substrate temperatures and follow manufacturer curves. Many clear coats require 24–72 hours at 20–25°C for full crosslinking; shorter times are acceptable at elevated temperatures per controlled bake cycles.
During post caint handling, avoid mechanical contact, solvents, and rapid thermal shocks that compromise surface integrity. Use infrared thermometers and taped lift tests to verify stabilization before claying, polishing, or applying protective layers. If you must accelerate, use validated ovens or forced air setups. Document time-temperature profiles to prevent undercure or overbake that reduce coating performance.
Frequently Asked Questions
Can Clay Bars Remove Water Spots Etched Into Clear Coat?
No, clay bars won’t remove water spots etched into clear coat. You’ll remove bonded contaminants, reducing surface roughness and emit dust risks. However, etching is material loss in the clear coat that clay can’t fix.
You should use corrective polishing or wet sanding followed by polish and protection to restore gloss. Take care: aggressive polishing can cause paint swirls, so proceed with proper technique, abrasives, and lubrication.
How Often Should I Clay My Car Annually?
You should clay your car 1–2 times per year as part of annual maintenance. Frequency depends on exposure: public parking, heavy industrial fallout, or frequent brake dust may push you to twice yearly. Garage-kept, low-exposure vehicles can manage once.
Always inspect by feel: if paint feels rough after washing, clay it. Use proper lubrication, light pressure, and divide panels to avoid damage and ensure effective contaminant removal.
Can Clay Baring Affect Factory Paint Warranties?
Yes, clay baring can have warranty implications if done improperly. You’re liable for clay bar risks like paint marring from insufficient lubrication, excessive pressure, or using contaminated clay.
Factory warranties often exclude damage from after-market maintenance; document professional services or follow manufacturer-approved procedures to avoid disputes. Use correct technique, clean clay, and ample lubricant to minimize risks and preserve warranty coverage.
Is There a Safe Clay Alternative for Vinyl Wraps?
Yes, you can use safe vinyl alternatives like dedicated clay mitts, synthetic clay towels, or iron-removal sprays formulated for wraps. You’ll want products labeled for vinyl wrap care that use low-tack polymer surfaces or chemical decontaminants to lift bonded particles without abrasion.
Work with plenty of lubricant, low pressure, and shaded conditions. Test any method on a discreet area first, and replace contaminated tools promptly to avoid scratching or degrading the wrap.
Can I Clay Bar After Applying Ceramic Coating?
You shouldn’t clay bar after applying ceramic coating; you’ll risk abrading or removing the coating. If contamination appears, use a gentle pH-neutral maintenance wash and iron remover, or a safe detailing spray designed for coated surfaces.
For stubborn bonded debris, perform claying before recoating during a planned maintenance cycle.
Two word discussion idea 1: maintenance interval. Two word discussion idea 2: coating longevity. Follow manufacturer recommendations.
Conclusion
You’ve now got the essentials: choose the right clay grit for contamination level, always use a compatible lubricant, and work within the optimal temperature and humidity ranges to avoid marring or trapping moisture.
Allow adequate curing/drying time before applying coatings or sealants. Use safe methods—controlled heat, airflow, or compatible accelerants—only when necessary.
Handle the paint gently post-cure to prevent defects and ensure lasting finish integrity.