Oil Change Safety Precautions
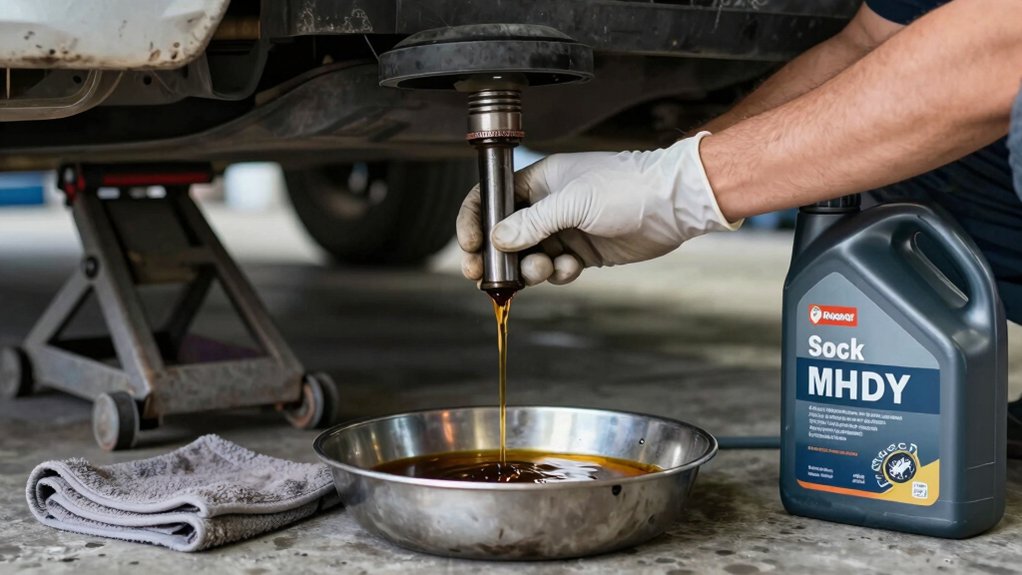
When you change oil, use the OEM/API‑specified oil and correct viscosity. Avoid guessing, and refill slowly while rechecking the level after settling. Torque the drain plug to the vehicle spec with a torque wrench; inspect threads and washer. Recheck for leaks after a short run.
Use a compatible thread sealant sparingly on male threads only; let it cure and avoid contaminating the filter gasket. Wear gloves, store products properly, and follow disposal rules. Keep going for detailed steps.
Quick Overview
- Verify oil type and OEM/API specs (viscosity, GF‑/CK‑/FA‑ratings) before filling to prevent engine damage.
- Use a properly calibrated torque wrench and torque drain plug to manufacturer specification; inspect threads and washers first.
- Apply thread sealant sparingly to male threads only. Choose PTFE, anaerobic, or gasket compound compatible with oil/filter materials.
- Hand‑thread and snug the filter correctly. Then run the engine briefly and recheck for leaks and correct oil level after settling.
- Wear gloves and eye protection. Allow sealants to cure and store/dispose used oil and materials per local regulations.
Oil Type & Torque Specs
Which oil should you use? You check the owner manual first and match API/ILSAC or OEM specs; then select oil viscosity and engine oil weight per temperature and manufacturer guidance. Use GF‑6/GF‑5 for modern gasoline, CK‑4 for heavy diesel, and avoid FA‑4 unless specified.
| Type | Typical Grades |
|---|---|
| Gasoline | 0W‑20, 5W‑30 |
| Diesel | 10W‑30, 15W‑40 |
Pick oil by required HTHS and additive limits (phosphorus, sulfur, TBN). Confirm compatibility: CK‑4 is backward compatible; FA‑4 is not. Fill gradually, recheck level after settling, and recycle used oil.
Don’t guess viscosity. Wrong engine oil weight reduces protection and may void warranties.
Drain Plug Torque Chart
After you’ve selected the correct oil and filter, set the drain plug torque to the manufacturer’s specification to avoid leaks or stripped threads. You’ll use a torque wrench and the vehicle manual or a reliable torque chart to get the exact value for your drain plug and oil pan material.
Follow a simple, consistent process so you don’t risk under- or over-torquing.
- Verify vehicle make/model/year for the correct torque number.
- Clean threads and inspect the drain plug and crush washer before reuse.
- Tighten by hand; then apply the torque wrench to the specified value in one smooth motion.
- Recheck after a short drive and inspect for leaks.
Accurate torque protects threads and prevents oil loss.
Filter Thread Sealant Type
When you choose a thread sealant, understand it’s meant to prevent leaks and seal mating surfaces without contaminating the oil. Compare sealant types (PTFE tape, liquid anaerobic sealants, gasket-specific pastes); check compatibility with filter materials and oil service; and follow manufacturer guidance.
Apply sparingly to threads, wipe excess, and allow proper curing time before starting the engine.
Thread Sealant Purpose
Because the filter threads and drain plug can leak under pressure and vibration, you should use an appropriate thread sealant to ensure a reliable, oil-tight seal without damaging parts. You’ll apply sealant sparingly to clean, dry threads to prevent seepage and avoid excess that can contaminate oil passages.
Choose a product compatible with oil and gasket materials; follow manufacturer directions for curing and drying times so the joint reaches full strength before pressure cycles. Let sealant cure fully if specified; don’t over-torque while tacky. After curing, inspect for even coverage and remove any displaced residue.
Proper use reduces oil leaks, minimizes rework, and protects components from galling and corrosion during service.
Types Of Sealants
Which sealant should you pick for drain plugs and filter threads depends on the application, materials, and service conditions. You’ll choose between thread tape, anaerobic liquid sealant, or silicone gasket compounds.
Thread tape (PTFE) is tidy, resists oil, and is good for steel or plated fittings; wrap two to three turns and avoid bulk on tapered threads. Anaerobic sealants cure without air, fill gaps, and prevent vibration loosening. Use them on close-fitting metal threads and follow cure times.
Silicone gasket compounds are flexible for soft materials but can contaminate some filters; therefore, limit use. When deciding, consider sealant compatibility with oil, rubber gaskets, and filter coatings. Keep a small kit with labeled options and two word discussion ideas for team decisions.
Compatibility With Filters
Curious about which sealant won’t damage your filter or cause leaks? You should prioritize compatibility considerations: use sealants specified for oil-filter threads or OEM-approved non-hardening compounds. Avoid pipe dope or threadlocker that can swell or contaminate the gasket.
Check filter material: rubber gaskets tolerate oil-based lubricants but not solvent-heavy products. When preparing the filter, ensure proper filter mounting alignment; misalignment can shear gaskets even with correct sealant.
Apply sealant sparingly to male threads only if the manufacturer recommends it, and never coat the gasket surface. Hand-thread the filter until it seats, verifying smooth engagement and consistent alignment.
If you doubt compatibility, consult the vehicle manual or filter maker to prevent leaks, contamination, or premature gasket failure.
Application Techniques
How should you apply a thread sealant to an oil-filter mounting stud without risking leaks or gasket damage? Use a lubricant-compatible, oil-resistant sealant sparingly: a single thin film on the stud threads only.
Don’t coat the gasket or mating face; excess sealant can push into the oil passage, altering oil viscosity locally and causing pressure irregularities. Hand-start the filter, then snug to the manufacturer’s recommended turns. Over-tightening deforms the gasket and may create leaks.
After installation, run the engine briefly and listen for abnormal engine noise. A whistle or rattle can indicate a leak or misfit. Recheck for seepage after warm-up and a short drive. Clean any smeared sealant immediately; replace the filter if contamination reaches the filter media.
Curing And Drying
After you’ve applied a thin film of oil-resistant thread sealant to the mounting stud and installed the filter, allow the sealant to cure undisturbed for the time specified by the manufacturer: typically 15 minutes to several hours depending on product chemistry. Before exposing it to engine heat and pressure, keep the vehicle stationary and avoid starting the engine; movement can disturb the seal and cause leaks.
Check the product label for temperature and humidity limits, since low temps slow curing and high humidity can alter drying characteristics. After the recommended cure time, inspect the bead for continuity and tackiness: a fully cured seal will be firm, not gummy. Record cure time and conditions for future reference and maintenance planning related to safety and storage.
Safety And Storage
Where should you keep filter thread sealant and how should you handle it to minimize risks? Store sealant in its original, labeled container in a cool, dry area away from direct heat and ignition sources. Keep it upright with the cap tightly closed to prevent leaks and contamination.
Use small, dedicated storage containers for partial tubes to avoid cross-contamination; label date opened and contents. When applying sealant, wear gloves and safety glasses. Work in a well-ventilated area and wipe excess immediately onto a rag stored for proper oil disposal.
Never mix sealant with used oil or pour it into drains. Transport and store used rags and sealant waste in sealed bins. Take them, along with used oil in sealed storage containers, to recycling or hazardous-waste facilities.
Frequently Asked Questions
Can I Change Oil in Rainy or Cold Outdoor Conditions?
Yes, you can, but you’ll need weather preparedness and attention to oil viscosity. In cold, you’ll want lower-viscosity oil for flow and to warm the engine briefly so oil drains.
In rain, shelter the work area with a tarp or garage to avoid water contamination and slippery surfaces. Wear protective gear, secure the vehicle, keep tools dry, and recycle used oil properly.
Don’t rush; prioritize safety and cleanliness.
How Do I Prevent Skin Irritation From Used Oil?
Wear rubber gloves and long sleeves to prevent skin irritation; don’t touch used oil directly. Use goggles and safety glasses for personal protection when splashing is possible. If oil contacts skin, wash promptly with soap and warm water. Then apply a gentle moisturizer to restore skin barrier.
Change contaminated clothing immediately and launder separately. Seal used oil in containers to avoid leaks and handle waste at recycling centers to minimize ongoing exposure.
What Should I Do if Oil Spills on Driveway?
If oil spills on your driveway, contain it quickly using absorbent pads, cat litter, or sawdust to prevent spreading. Sweep material inward; then shovel into a sealable container for proper disposal.
For stains, apply degreaser or a baking soda and dish soap paste. Scrub with a stiff brush, then rinse sparingly toward a grassy area or storm drain-free zone. Label and recycle contaminated absorbents at a hazardous-waste site.
Can I Reuse Oil Containers for Household Storage?
No, you shouldn’t reuse oil containers for household storage. Used oil containers can retain toxic residues and contaminate food, water, or surfaces.
Can I store used oil containers? Only if you keep them sealed and labeled for automotive waste until proper disposal.
Recycling options: rinse triple-times only if accepted. Then take containers and used oil to a recycling center or hazardous waste facility; never put them in regular trash or repurpose for food.
How Do I Safely Lift an SUV With Uneven Ground?
You shouldn’t lift an SUV on uneven ground; instead, move it to level ground whenever possible. If you must, choose the firmest spot. Chock wheels downhill, engage parking brake, and use a low-profile jack pad under the manufacturer lift point.
Raise only enough to set jack stands on stable, equal-height supports; never rely on the jack alone. Recheck stability before working. Keep tools nearby, and avoid sudden movements to maintain lifting safety on uneven ground.
Conclusion
You’ve covered the essentials: know the correct oil type and torque specs, use the right thread sealant for your filter, and follow proper application and curing steps. Tighten drain plugs and filters to specified torques; avoid over-application of sealant, and keep incompatible products apart.
Store sealants per manufacturer instructions and dispose of used oil and filters responsibly. By following these practical, detail-focused steps, you’ll minimize leaks, protect threads, and stay safe during oil changes.