One Step Vs Two Step Paint Correction
You’ll pick one-step when you need efficient light-to-moderate defect removal and a ready-for-protection gloss. It removes about 50–80% of defects, runs faster, and suits maintenance jobs.
Choose two-step for moderate-to-severe defects or showroom-level results: aggressive compounding then refining polish yields deeper cut and finer finish but takes more time and heat control. Adjust pad type, RPM, and dwell by ambient temperature and humidity to manage cure and outcome. Keep going to learn practical setup and timing.
Quick Overview
- One-step combines light compounding and finishing for 50–80% defect removal and fast, glossy maintenance results.
- Two-step uses an aggressive compound then a fine polish to remove moderate-to-severe defects and achieve showroom finish.
- Choose two-step for neglected or high-value vehicles; use test panels to confirm required aggression and pad/polish pairing.
- Pad type and RPM control cut versus finish: harder pads with mid RPM for cut, softer pads with low RPM for final gloss.
- Adjust dwell, flash, and processing times for temperature and humidity to avoid overheating. Ensure proper cure.
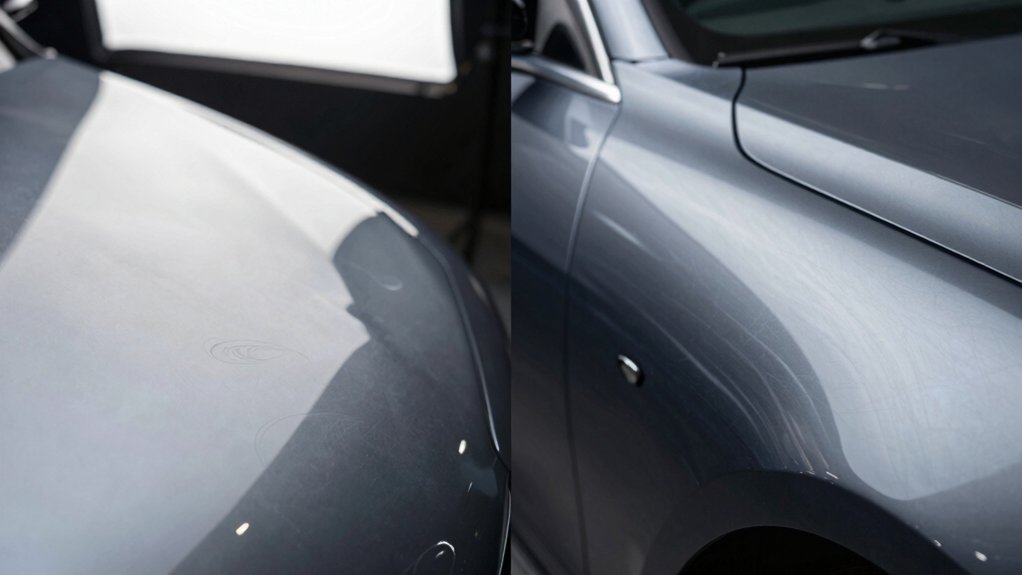
Cut Depth & Finish Comparison
How deep do you need to cut to get the finish you want? You’ll choose based on cut depth versus final clarity. Two step versus one step isn’t opinion; it’s measurable. One-step cuts light to moderate defects (50–80% removal) and gives glossy, ready-for-protection finishes with all-in-one polishes and light pads.
Two-step cuts moderate to severe defects: aggressive compounding removes heavy swirls or oxidation; then polishing refines haze to showroom smoothness. You’ll work small areas with two-step to manage heat and avoid thinning. Test panels define necessary aggression; match compound or pad to defect severity. Use one-step for maintenance and time-limited jobs. Use two-step for neglected or high-value finishes requiring maximum correction.
| One-Step | Two-Step |
|---|---|
| Light-moderate cut depth | Moderate-severe cut depth |
| Quick, glossy finish | Showroom, refined finish |
Pad & Polish Speeds
Selecting pad type and polishing speed determines material removal rate, heat generation, and finish quality. You should match pad aggressiveness and RPM to the defect and polish used. You’ll control cut versus finish by pairing pad density with pad speeds and polish speeds; harder pads at mid RPMs increase cut, while softer pads at lower RPMs preserve gloss. Monitor heat and pad loading. Reduce RPM if polish starts running or surface warms.
Use slow, dense-pad and heavy polish combo for deep defects. Use moderate RPM with medium pads for balanced correction. Use low RPM with soft pads and fine polish for finish refinement. Reduce speed and pressure when near edges or thin clearcoat.
Test each combination on a panel to quantify removal and finish.
Temperature-Dependent Curing Times
You’ll need to account for ambient temperature because it directly alters product cure rates and pad/polish behavior. Higher heat accelerates curing and can increase the risk of residue setting or solvent popping. Cold temps slow chemistry and extend drying times; humidity further modulates both.
Plan your one- or two-step workflow around these limits to avoid incomplete polish removal, extended flash times, or heat-induced clear coat stress.
Ambient Temperature Effects
Because curing rates for polishes, sealants, and fillers change with ambient temperature, you’ll see noticeably different drying and bonding times in cool versus warm conditions. Lower temperatures slow solvent evaporation and chemical reactions; higher temperatures accelerate them and can shorten working time.
You must monitor ambient humidity alongside temperature because vapor pressure affects solvent loss and the development of paint gloss. In practice, cooler, humid environments require extended dwell times and delayed buffing to avoid trapping solvents and reducing durability. Warmer, dry conditions speed cure but reduce working window, increasing risk of holograms or inadequate leveling if you rush.
Adjust pad speed, pressure, and overlap. Stage two-step processes with longer flash times in cool conditions; choose products rated for the specific temperature range to maintain consistent results.
Product Cure Rates
Ambient temperature and humidity don’t just affect working times; they directly change cure rates for polishes, sealants, and fillers. You must account for temperature-dependent kinetics: higher ambient temperature accelerates solvent evaporation and crosslinking, shortening product cure windows. Lower temperature slows reactions, extending dwell time and risk of incomplete cure.
Measure surface and ambient temperatures, follow manufacturer-specified cure curves, and adjust flash and buff intervals accordingly. Expect cure variability between product chemistries: siloxane sealants, acrylics, and fillers respond differently to the same temperature shift.
Plan sequencing so a faster-curing polish won’t entrap slower-curing sealant under subsequent passes. Document ambient conditions during correction to correlate outcomes with cure variability. This reduces rework and preserves intended hardness, gloss, and longevity.
Humidity Interaction Impact
When relative humidity rises, it slows solvent evaporation and crosslinking in polishes, sealants, and fillers. You must adjust cure expectations and processing windows accordingly. You’ll notice humidity impact on open time, tack development, and final hardness; higher moisture prolongs solvent dwell and delays molecular crosslinking kinetics.
In practical terms, you should extend dwell periods between application and buffing. Allow longer cure intervals before applying sealants or wash cycles, and avoid layering fast-curing products in humid ambient effects. Measure RH and document ambient effects to set repeatable process parameters: temperature, RH, product type, and pad speed.
For controlled outcomes, use lower-RH environments or products with humidity-tolerant chemistries. Validate cure with tack tests and hardness checks before service completion.
Cold Weather Limitations
Lower temperatures slow solvent evaporation and chemical crosslinking; you will need longer cure and open times for polishes, sealants, and fillers than you would at moderate conditions. In cold weather, you must adjust dwell times, pad selection, and machine speed to maintain cutting and finishing efficiency while avoiding glazing from under-cured residues. Measure substrate and ambient temperatures. Many products list minimum application and cure temperatures; ignore them at your peril.
Also, account for humidity interaction: lower temperatures often raise relative humidity, which can retard solvent release and promote streaking or incomplete film formation. Plan longer inspection intervals and controlled storage for treated panels until full cure. When temperatures approach product limits, defer work or move to a heated workspace to ensure predictable results.
Heat Accelerated Risks
Because heat speeds solvent evaporation and reactive crosslinking, you’ll see noticeably shorter open and cure times for polishes, sealants, and fillers. You must adjust application technique and timing to avoid defects. In high-temperature environments, you’ll encounter a clear heat risk: reduced working time increases the likelihood of holograms, buffer marring, and trapped residue. You should lower pad speed, work smaller panels, and keep product thin to maintain control.
Accelerated cure also raises overspray hazards when using aerosol sealants or fillers. Particles set faster, making cleanup harder and increasing contamination risk. Monitor substrate temperature with an infrared thermometer; follow manufacturer temperature windows, and allow extended flash times when necessary. These controls minimize defect rates and protect clear coat integrity during one- or two-step correction.
Frequently Asked Questions
How Long Does Paint Correction Affect My Car’s Warranty?
Paint correction itself doesn’t automatically void your paint warranty, but manufacturers care about paint warranty and maintenance timing. If you use abrasive methods incorrectly or cause clearcoat damage, the warranty claim can be denied.
Keep records of professional service, products, and intervals; perform maintenance on schedule. For applied coatings, warranties often list specific maintenance timing and approved installers: follow those to preserve coverage and avoid disputes.
Can Clear Coat Thickness Be Measured at Home?
Yes, you can measure clear coat thickness at home with the right tools. For accurate home measuring, use a magnetic or electronic paint thickness gauge (F-n or non-destructive). Calibrate on bare metal and known samples, then take multiple readings across panels.
Clear coat feasibility depends on gauge resolution and your technique. Lower-cost gauges give estimates; however, professional units provide precise micrometer-level data if you avoid contamination and inconsistent pressure.
Will Polish Residues Affect Ceramic Coatings Later?
Yes, polish residue can compromise ceramic coating compatibility if not fully removed. You’ll see reduced bonding and uneven hydrophobic performance where oils or fillers remain.
Always decontaminate and use an appropriate panel wipe (isopropyl alcohol blend) after polishing. Inspect under bright light, and repeat wiping until no residue transfers. Proper surface prep ensures optimal chemical bonding, durability, and uniform gloss from the ceramic coating application.
Is One-Step Safe on Plastic Trim and Bumpers?
Yes, you can use a one-step on plastic trim and bumpers, but you should be cautious. One step benefits include reduced aggressiveness and faster correction; this lowers the risk of melting, whitening, or sanding through softer plastics.
Two step limitations include higher cutting force, heat, and pad/aggressor combos; these increase damage risk on plastics. Test an inconspicuous area, use light pressure, low speed, and plastic-safe pads/compounds to avoid hazing or deformation.
How Often Should I Repeat Paint Correction for Maintenance?
You should repeat paint correction based on paint longevity and maintenance frequency: typically every 12–36 months.
If you drive daily, park outside, or notice gloss loss and swirls, target 12–18 months. Well-maintained, garage-kept vehicles with protective coatings can extend to 24–36 months.
Monitor defects and measure gloss; increase frequency if defects return quickly. Balance correction aggressiveness with clearcoat health to preserve longevity.
Conclusion
You’ll choose one-step when speed and minimal clearcoat removal matter. You will choose two-step when you need deeper defect removal and a superior finish. Consider pad/polish RPMs and cutting depths: one-step uses more aggressive combos to save time; two-step separates compounding and finishing to control heat and cut.
Watch ambient temperature, humidity, and product cure rates. Cold slows curing and risks marring; heat speeds chemistry but raises burn risk. Match method to conditions, paint thickness, and end-quality goals.