Undercarriage Washing Methods
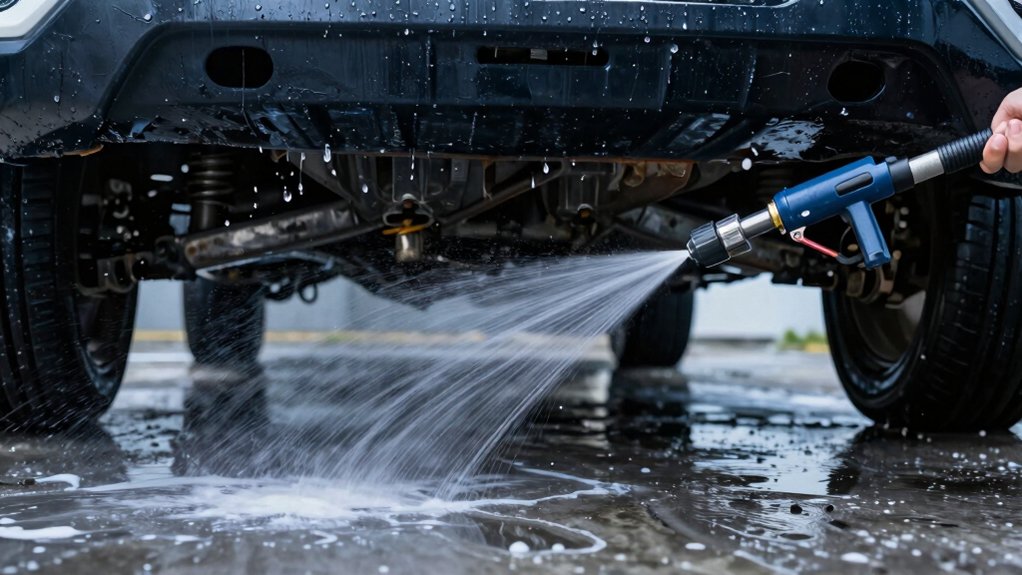
You should flush the undercarriage within 24 hours after salt exposure using targeted high-pressure rinses. Start with 25°–40° nozzles and focus 30–60 seconds on seams, drain plugs, and fasteners. Avoid 0°/15° on thin metals.
Divide multi-nozzle GPM correctly to prevent back pressure. Dry or drive briefly to expel trapped water. Then apply corrosion inhibitor and protective coating to joints and bolts.
Inspect and torque fasteners after the initial run. Continue for full procedural guidance.
Quick Overview
- Rinse the undercarriage within 24 hours after saltwater exposure using a high-pressure washer or automated undercarriage cycle for thorough flushing.
- Focus spray for 30–60 seconds on wheel wells, frame rails, seams, and drain plugs to dislodge salt, mud, and trapped water.
- Use wide-angle nozzles (25°–40°) for coverage and switch to tighter orifices only if needed. Avoid 0°/15° on thin metals or lines.
- After rinsing and drying, apply corrosion inhibitor to joints, fasteners, and seams. Then protect with a durable coating per manufacturer intervals.
- Inspect and clear drain plugs and cavities. Document exposures and schedule regular underbody inspections for early corrosion detection.
Nozzle Pressure Comparison Chart
Why pick the right nozzle? You need correct nozzle pressure to protect pumps and ensure effective undercarriage cleaning. Use chart comparisons to match GPM and PSI to orifice size and angle. Start wide (25°–40°) for coverage; tighten only if needed. Avoid 0°/15° near thin metals and lines.
| GPM Range | Recommended Orifice | Angle/Use |
|---|---|---|
| 4–6 | 025–04 | 25°–40° general undercarriage |
| 8–15 | 05–08 | 25°–40° heavy buildup |
| 20+ | 09–10 | wider orifice, lower impact per nozzle |
Check charts: multi-nozzle splits GPM per outlet. Too-small orifice causes back pressure and pump damage. Test on a small area; wear eye protection, and replace clogged nozzles promptly.
Torque & Torque Specs
Nozzle selection affects more than spray pattern; tightening fasteners to the correct torque matters when you assemble or service undercarriage cleaning equipment. You should follow manufacturer torque specs for spray bars, brackets, and rotating heads to prevent leaks, misalignment, or component fatigue.
Use a calibrated torque wrench, apply threadlocker where specified, and re-check fasteners after initial operation.
- Verify torque specs on the equipment data plate or manual.
- Set your torque wrench to undercarriage torque values specified for brackets and mounts.
- Torque in stages and use proper sequence for multi-bolt flanges.
- Inspect fasteners for stretch or corrosion; replace if out of tolerance.
Accurate torque control maintains spray geometry and extends service life without compromising safety.
Saltwater Corrosion Prevention Steps
If you drive in saltwater or salty conditions, rinse the undercarriage immediately after exposure to flush away corrosive salts. Use corrosion inhibitors and protective coatings. Clean drain plugs and cavities thoroughly, and inspect the underbody regularly for early signs of rust or trapped moisture.
These steps, combined with targeted undercarriage washes, will substantially slow saltwater corrosion.
Rinse Immediately After Exposure
Saltwater is highly corrosive, so rinse your vehicle’s undercarriage as soon as possible after exposure to remove salt, sand, and contaminants that accelerate rust. You should act within 24 hours; sooner if you’ll be storing the vehicle to limit electrochemical damage and abrasive wear.
Use a pressure washer or automated drive-through undercarriage cycle to flush seams, suspension mounts, and brake components. Self-service bays let you target wheel wells and frame rails. Track DIY rinse timing and undercoating maintenance schedules: rinse before applying or inspecting undercoating to guarantee adhesion and accurate assessment.
Focus on thorough, high-pressure coverage for 30–60 seconds per problematic area. Then dry or drive briefly to expel trapped water. Record exposures and rinses to support preventative maintenance and corrosion audits.
Use Corrosion Inhibitors
After rinsing away salt and debris, apply a corrosion inhibitor to give the undercarriage lingering protection against residual salts and moisture. You’ll choose a product formulated for automotive use: penetrating sprays for joints and heavier protective coatings for frame rails and floor pans.
Work methodically; target suspension components, seams, welds, and fasteners after the area’s dry. Apply thin, even films; avoid puddling near brake components or air intakes. Let penetrating inhibitors settle before adding a durable protective coating where long-term barrier performance is needed.
Reapply according to manufacturer intervals or after heavy exposure. Store chemicals per safety data sheets, use personal protective equipment, and dispose of runoff responsibly. This routine reduces electrochemical corrosion and extends service life.
Inspect Underbody Regularly
Why inspect the underbody regularly? You should follow a defined inspection schedule: monthly in salty coastal zones, quarterly elsewhere to catch early corrosion.
During each check, perform a rust risk assessment. Prioritize joints, welds, drain holes, suspension mounts, and areas with trapped moisture. Use a flashlight and mirror or elevating lift to verify coating integrity. Note flaking paint, surface pitting, and underseal failures. Document findings, photograph defects, and grade severity so you can compare trends over time.
If you find active corrosion, remove loose material. Apply corrosion converter or primer and schedule professional repair for structural components. Maintain logs to adjust the inspection schedule based on exposure, road treatments, and vehicle use patterns.
Clean Drain Plugs Thoroughly
When you inspect the underbody, pay close attention to drain plugs. These small fittings are where salt-laden water and trapped moisture collect, and they can quickly become blocked or corroded.
During undercarriage drain plug inspection, remove plugs methodically, clear debris with a soft wire pick or solvent, and verify drainage paths are unobstructed. Inspect sealing surfaces and threads for corrosion or cross-threading; replace compromised plugs or seals immediately.
When reinstalling, follow drain plug torque considerations from the manufacturer to avoid stripping threads or causing leaks. Use a calibrated torque wrench and specified fastener lubricant where recommended.
Record findings and actions in your maintenance log, and schedule rechecks after heavy salt exposure or mechanical cleaning.
Apply Protective Coatings
Corrosion inhibitors and barrier coatings protect exposed metal from saltwater attack, so you should apply them immediately after thorough cleaning and drying of the undercarriage. Inspect surfaces for chips, welds, and crevices; mask off sensors and exhaust.
Use a corrosion inhibitor spray on seams and fasteners. Then, apply a rubberized or wax-based protective coating to panels and structural members. Work methodically from rear to front while maintaining a 6–12 inches spray distance and overlapping passes to ensure uniform film thickness. Allow manufacturer-recommended cure time between coats and before road use.
Reapply inhibitors seasonally in salty environments and inspect undercoating durability annually. Repair damage or worn areas promptly. Use PPE, ventilate when applying solvents, and follow disposal rules for waste materials.
Store Vehicle In Dry
After applying and curing undercoating, you should store the vehicle in a dry environment to limit saltwater vapor and moisture exposure that accelerate metal and electrical corrosion. You’ll prioritize dry storage with controlled humidity (below 50%) and good ventilation to prevent condensation cycles that force salts into crevices.
When you store the vehicle indoors, seal gaps and use desiccants or dehumidifiers; monitor with a hygrometer. If indoor options aren’t available, elevate the vehicle on stands and cover it with a breathable, water-resistant tarp to reduce salt spray contact.
Perform periodic inspections of suspension, brake lines, and electrical connectors; remove surface salts promptly. Combined with routine undercarriage rinses and protective coatings, disciplined dry storage significantly slows saltwater-driven corrosion.
Frequently Asked Questions
Can Undercarriage Washes Damage Wiring or Sensors?
Yes, undercarriage washes can damage wiring or sensors if you use excessive pressure or harsh chemicals. You should follow undercarriage safety by avoiding direct high-pressure jets on exposed connectors, sensors, or control modules.
Sensor risk increases with older insulation, loose clips, or aftermarket wiring. Use touch-free or moderate-pressure methods; shield vulnerable components; disconnect sensitive modules when advised, and inspect seals and fasteners after cleaning to reduce damage likelihood.
How Long After Washing Should I Dry the Underside?
You should dry the underside as soon as possible; ideally within 15–30 minutes after wash. For effective undercarriage drying, remove standing water with compressed air or a leaf blower. Park on a warm, ventilated surface to accelerate evaporation.
Timing after wash matters most in cold or salty environments. If temperatures are low, use heat or a garage to prevent freeze and corrosion. Inspect seams and wiring after drying.
Can I Use Household Detergents for Undercarriage Cleaning?
You can use household detergents sparingly, but they’re not ideal for preventing undercarriage corrosion and may lack detergent compatibility with automotive metals and coatings. Choose pH-neutral, biodegradable cleaners labeled safe for metal and underbody use; or dilute mild dish soap short-term.
Avoid concentrated alkaline or bleach products, and rinse thoroughly. For best protection and long-term corrosion control, use products specifically formulated for automotive undercarriage cleaning and rust prevention.
Are Wheel Wells Included in Automatic Undercarriage Washes?
Yes, most automatic undercarriage systems include wheel wells in their Automatic Coverage. You’ll get high-pressure jets or spinning heads aimed into wheel arches, removing road grime, salt, and debris.
Coverage varies by tunnel design and package level; therefore, inspect or ask about nozzle placement and spray duration. For heavy buildup, you’ll need manual pressure washing or detailing to target inner wheel wells and suspension components more thoroughly.
Do Undercarriage Washes Affect Warranty Coverage?
Yes, undercarriage washes generally won’t void undercarriage warranties if you follow manufacturer guidelines and use approved services. You should avoid excessive pressure settings, careless DIY methods, or solvents banned by warranty terms.
High-pressure sprays can cause sensor damage risks or dislodge wiring; therefore, document service receipts and choose reputable providers. If concerned, consult your vehicle’s warranty manual or dealer for permitted cleaning methods and any required inspection after wash.
Conclusion
You’ve covered nozzle pressures, torque specs, corrosion prevention, rinsing after saltwater exposure, inhibitors, inspections, drain-plug cleaning, protective coatings, and dry storage. Now act. Follow specified nozzle pressures and torque values; flush salt and contaminants immediately. Apply corrosion inhibitors and coatings, and clean drain plugs during routine checks.
Inspect the underbody on a schedule, and store the vehicle dry. These practical, technical steps will minimize corrosion, extend component life, and reduce maintenance costs.