Waterless Wash Technique

Use a waterless wash with the correct dilution (e.g., detail 1:16, clay 1:64, rinseless 1:256) and filtered water.
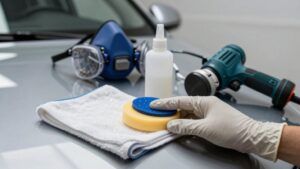
Spray a 2’×2′ panel with an even overlapping fan from 12–18 inches.
Let it dwell briefly (5–20 seconds depending on temperature); then lift soils with a folded microfiber, rotating towels as they load.
Avoid puddling and never wax over silicone sealants.
Clean joints first and test protection on a small area.
Continue for step‑by‑step application and safety tips.
Quick Overview
- Dilute product per task: Detail 1:16, Clay 1:64, Rinseless 1:256, concentrate 4:1; use filtered water for critical mixes.
- Spray a uniform overlapping fan 12–18 inches away to saturate 2’×2′ panels without puddling.
- Use short dwell times: cool panels 10–20s, hot/sun 5–10s; then wipe with a folded microfiber.
- Rotate and track towels; reapply solution liberally as cloths load. Repeat on high-dirt areas.
- Avoid waxing over silicone sealants. Remove silicone contamination and test protectants 24–72 hours before full application.
Waterless Wash Dilution Chart
A practical dilution chart helps you match product concentration to task and substrate: light dust, claying, full rinseless washes, and concentrated waterless sprays all require different ratios to balance lubrication, cleaning power, and spotting risk. You’ll use dilution accuracy to control lubrication and minimize water usage while preventing spots.
Use filtered or demineralized water for critical ratios. Typical targets include: quick detailer ~1:16, clay lube ~1:64, ONR rinseless ~1:256, concentrated waterless 4:1 or manufacturer full-strength mixes. Test small panels and adjust for soil load. Track towel rotation and reapply solution liberally to both surface and cloth.
Maintain a concise, labeled chart for each product and task to ensure repeatable, low-risk results.
| Task | Ratio |
|---|---|
| Detail | 1:16 |
| Clay | 1:64 |
| Rinseless | 1:256 |
| Concentrate | 4:1 |
Spray Pattern & Dwell Times
How should you lay down product to get consistent cleaning and protection? You’ll control spray pattern and dwell times to balance lift and safety. Use a uniform, overlapping fan to saturate 2′ x 2′ panels. Avoid concentrated puddles that shorten lubrication and increase abrasion risk.
Monitor dwell times: short on hot panels; longer on cool metal. This allows solvents to act without drying. Follow this numeric routine:
- Spray a fine fan 12–18″ from the surface for even coverage.
- Wait 10–20 seconds on cool panels; 5–10 seconds in sun or heat.
- Wipe using a folded microfiber, switching sides as soil loads.
- Re-spray high-dirt areas and repeat brief dwell + wipe cycles.
You’ll get consistent results by measuring distance, timing dwell times, and maintaining towel hygiene.
Avoid Waxing Silicone Sealants
Don’t wax over silicone sealants because silicone repels traditional wax polymers and prevents proper bonding to adjacent paint.
If you apply wax on or near silicone beads, you’ll likely see premature wax failure and potential surface discoloration where residues interact.
Always clean and fully remove silicone contamination before treating paint to ensure reliable product adhesion and uniform appearance.
Why Avoid Waxing
Careful maintenance means you should avoid waxing over silicone-based sealants: Silicone forms a slick, nonporous layer that prevents proper adhesion of wax and can cause unsightly beading, streaking, or patchy removal when you try to buff it out.
You’ll find wax duration and application frequency become unpredictable when silicone is present. Wax won’t bond uniformly; therefore, durability metrics degrade and you’ll need to reapply more often. Avoiding wax on sealant lines preserves intended seam sealing and prevents transfer of silicone contaminants onto surrounding paint during buffing.
If you must protect painted panels near silicone, use sealant-compatible polymers or mask off joints. Inspect edges after each wash cycle and remove any wax residue with approved solvent-free cleaners.
Silicone Repels Waxes
Silicone creates a slick, nonporous barrier that prevents wax from bonding to paint, so you should avoid applying wax over silicone sealants. When you encounter sealant residues on trim, gaskets, or patched seams, understand silicone repellence reduces adhesion of organic and synthetic wax chemistries.
Inspect panels and trim edges. Remove silicone contamination with an appropriate solvent or clay procedure before attempting protection layers.
Control wax interaction by isolating treated areas: do not apply paste, liquid, or spray waxes where silicone films persist. Test a small area to confirm bonding. If wax fails to set or beads, re-clean with a silicone-specific remover and verify surface energy restoration.
Proper prep ensures the protective polymer network in wax establishes mechanical and chemical contact with clear coat; this yields reliable durability.
Wax Bonding Failure
If you try to apply wax over areas contaminated with silicone sealants, the wax won’t bond and will bead or flake off prematurely. You must identify silicone-contaminated joints, trim, or residues before waxing. Silicone creates a low-energy surface that prevents proper wax bonding; even trace amounts disrupt adhesion.
For reliable results, isolate affected panels and avoid applying wax until contamination is removed. Your surface prep should include targeted solvent-based removal or adhesive-safe cleaners designed to break silicone films, followed by a tack-free wipe and inspection under angled light. After removal, perform a final decontamination step: alcohol wipe or dedicated surface prep to ensure consistent surface energy.
Skipping these steps guarantees cosmetic failure and wasted product; be methodical.
Surface Discoloration Risk
Why does waxing over silicone sealants risk discoloration of adjacent paintwork? You avoid waxing silicone because volatile components migrate into porous paint edges and trap contaminants. When you apply wax to silicone-tainted seams, oils and additives form a thin transfer layer that accelerates surface discoloration through chemical staining and uneven light reflection.
You’ll notice localized dulled areas and yellowing that compromise color uniformity and masking of micro-scratches. For a meticulous long term finish, keep sealant joints free of polishes, waxes, and sealers. These products can embed into the silicone matrix and resist removal. Inspect seams before protective treatments; use compatible non-silicone-safe formulations elsewhere to preserve gloss, color fidelity, and durable, predictable long term finish.
Cleaning Before Treatment
Preparation matters: before applying any protective treatment, thoroughly clean and inspect seams and sealant joints to ensure no wax, polish, or oily residue remains. You’ll remove contaminants with a high-lubricity waterless solution and clean microfiber towels, targeting silicone sealants and adjacent seams.
Don’t wax silicone; waxes bond poorly and trap oils that compromise adhesion. Use light agitation with a fresh edgeless towel, alternating panels and inspecting for residue transfer. Note the topic pairing of sealant inspection and solvent selection: choose non-oily, residue-free cleaners compatible with polymers.
This technique contrast—cleaning versus coating—prevents sealant degradation and ensures subsequent treatments adhere uniformly. Finish by verifying joints are dry and residue-free before any protective application or performance testing.
Alternative Protective Coatings
You’ve finished cleaning and confirming seams and sealant joints are free of oils and waxes. Now choose protective options that won’t compromise silicone performance. You’ll avoid waxes and solvent-rich dressings. Instead, select alternative coatings formulated to bond to paint without interacting with silicone sealants.
Evaluate protective chemistries for inertness, UV stability, and low volatility. Favor hydrophobic silane or fluoropolymer sprays that form thin, durable films and won’t plasticize or inhibit silicone cure. Apply in controlled, small sections, using clean microfiber to prevent contamination.
Verify compatibility on an inconspicuous test area for 24–72 hours before full coverage. Maintain records of product lot, application conditions, and service interval. Reapply per manufacturer guidance to preserve performance without compromising seams or sealant integrity.
Frequently Asked Questions
Can Waterless Wash Remove Bird Droppings Safely?
Yes, you can remove bird droppings with a waterless wash, but you’ll manage safety concerns carefully. Spray liberally, let lubricants suspend and soften deposits, then lift gently with fresh microfiber to avoid etching.
For stubborn, dried droppings, reapply and allow dwell time rather than scrubbing. Rotate towels frequently to prevent abrasive contamination. If stains persist or paint is compromised, switch to a traditional wash or professional treatment.
How Often Should I Use Waterless Wash on My Daily Driver?
Use waterless wash about once every 1–2 weeks for a daily driver. Use it more often if pollutants accumulate. That frequency balances paint protection and safe techniques. Always work in small 2’×2′ sections; saturate surface and towel, fold microfiber to clean faces, and switch towels before they trap abrasive grit.
Avoid heavy mud. Reserve traditional washing for severe soiling. Increase frequency in dusty or salty environments to prevent etching and corrosion.
Are Waterless Products Safe on Matte or Satin Finishes?
Yes, you can use waterless products on matte finish safety and satin finish compatibility. However, you must choose formulas labeled safe for matte/satin. You’ll spray small sections, use ultra-soft microfiber, and avoid polishing or waxing ingredients that add gloss.
Test a hidden spot first. Work conservatively and rotate clean towels frequently to prevent micro-scratches. If heavy contamination exists, revert to low-pressure rinseless or professional cleaning instead.
Can I Use Waterless Wash on Chrome and Metal Trim?
Yes, you can use waterless application on chrome and metal trim if you follow precautions. Choose a product labeled chrome compatibility and ensure high-lubricity formulas to avoid micro-scratches.
Work in small sections; spray both surface and microfiber. Use multiple clean edgeless towels, rotating sides as they soil. Avoid abrasive pads or heavy pressure. Finish by buffing with a soft cloth to restore shine and remove residue.
How Do I Dispose of Used Microfiber Towels Properly?
You should follow disposal guidelines: launder towels until they’re unusable, then discard or repurpose. Track towel lifecycle: rotate, inspect for embedded grit, and retire when fibers thin or soil won’t release.
Wash with mild detergent; avoid fabric softeners. Dry low. For contaminated towels (chemicals, heavy oils), double-bag and follow local hazardous-waste rules.
When trashing, cut into rags to prevent reuse and label if contaminated to inform handlers.
Conclusion
You’ve learned how to mix and apply waterless wash solutions precisely: follow the dilution chart, test spray patterns, and respect dwell times to avoid surface damage.
Don’t apply traditional wax over silicone-based sealants. Silicone repels wax; this causes poor bonding and risks discoloration. Always clean thoroughly before any protective treatment. When wax isn’t compatible, choose alternative coatings formulated for silicone or use paint-safe sealants to ensure durable, uniform protection.